

This is a long tutorial. View the Shorter Version if you wish.
Updated 8/1/2015
Set Up Windows 8 in the Desktop-Only mode.
Contents
Windows 10 is available now!
Making Windows 8 Run more like Windows 7
Boot straight to the desktop
Create a Shutdown Button
Create a Quick Launch Menu
Get to your Windows 8 Apps
Recap what you've done so far. (+ the Quick Link Menu)
The Windows 8 Lock Screen
Enable the Hibernate Option
THIRD PARTY START BUTTON MENU PROGRAMS
Watch the Installer
Where to find good programs for your PC
Back up your PC and your data!
Windows 8 Hot Keys
Watching DVD Movies with Windows 8
Boot your PC without a Windows Logon Password
Use a Four-digit PIN to logon to your PC
Upgrading (from Windows 8) to Windows 8.1
Windows 8.1 Update
Setting Program Defaults
Disable the Modern Apps
Run the Modern Apps
Compatability concerns with Windows 8
Reset your login password in Windows 8
Where are my Libraries?
Microsoft is offering all users of Windows 8 (and Windows 7) PCs a free update to Windows 10 when it is officially introduced on July 29, 2015. All users who have PCs with Windows 8.1 or Windows 7 will have one full year from that date to upgrade to Windows 10 completely free of charge.
See this Microsoft page about the upgrade offer and learn how to get Windows 10.
Windows 10 will be installed through Windows Update. Users will be notified when Windows 10 is ready to be installed and users will be allowed to apply the update when they are ready, at the time of their choice.
Hate Windows 8?
If you do not like Windows 8 this is your chance to get rid of it entirely and replace it with a new Windows operating system that includes a true Start Menu as well as the security features already included into Windows 8. Windows 10 starts up nearly twice as quickly as Windows 7 does, same as Windows 8. In addition Windows 10 includes other new features such as virtual desktops, a feature that Unix users have enjoyed for years.
An added bonus is that all new apps, as well as all those from the Store now run in their own resizable windows on the Desktop rather than full screen. This includes PC Settings as well since the aggravating Charms Menu is gone!
Even if you like Windows 8 you should probably allow the upgrade - sooner or later - since Windows 10 also includes the option to switch between the Desktop with the Start Menu and the Start Screen. Moreover, the operating system software will auto-detect whether a keyboard and a mouse is attached or not then load the user interface preferable for each configuration - The Start Screen for touch-based tablets and the Desktop, Start Menu when a keyboard and/or mouse is attached to the PC.
No need to get in a hurry
For those of you who do not wish to upgrade I plan to leave this Windows 8 guide in place so it will be here if you need it.
For those of you who plan to upgrade I'll leave you with one bit of advice. It's not necessary to get in a hurry to upgrade. Windows 10 will be free for the entire year after its introduction for those who qualify. (If your PC is running a valid copy of either Windows 8.1 or Windows 7 SP1 you should be good.)
To avoid the nearly inevitable glitches that sometimes manifest themselves with such comprehensive upgrades it may be better to wait a bit to be sure as you can be that Windows 10 will run properly on your PC after the upgrade. I suggest that you follow the advice of PC experts who will, almost assuredly, post numerous articles about Windows 10 Upgrades on popular PC websites such as CNET, PC Magazine, and PC World Magazine. Perhaps doing so will save you some avoidable grief if and when there are upgrade problems.
Not only get a new and free operating system for your PC but get it Right!
Just don't wait too long. If you allow the entire year to pass without upgrading then Windows 10 will cost you $119. Take advantage of the completely free upgrade offer before July 29, 2016 to save some cash!
And remember, if you don't particularly like the look of Microsoft's new Start Menu with tiles that comes with Windows 10 you will still be able to install a Third-Party Start Button Menu Program so that your Start Menu will be more recognizable and user-friendly for former Windows 7, Vista, and XP users.
Compatability concerns?
If you are concerned that a PC with Windows 8 may not run programs created for a previous version of Windows see this compatability note before you spend extra money to get a PC with Windows 7 instead of Windows 8.
The new Windows 8 is faster, more secure - but also more radical than previous Windows operating systems. It also works well for tablet PCs and those that have touch screens.
However many people, especially those who have laptop or desktop PCs with no touch screens don't like the Modern Windows 8 Start Screen.
Many PC users have also been dismayed to learn that Microsoft has removed the familiar Windows Start Button Menu from the desktop forcing users to muddle through the new Start Screen instead. Also, not included is an easy way to boot directly to the desktop.
Using the new Windows 8 (Modern) Start Screen with a mouse (or laptop touch pad) and a keyboard is, in my opinion, not very intuitive to say the least. This forces even veteran PC users to hunt around, wasting time to perform even the most basic tasks.
For example, the power (shutdown) button is tucked away, hidden in the Settings Menu of the Charms Bar, instead of being plainly visible. And that's not the only thing Microsoft has hidden or obscured in Windows 8. More on that later.
If you're one of those who feels this way here's how to configure your Windows 8 PC so you won't need to see the Start Screen quite so much (unless you want to).
You may wish to read through this tutorial first - before making any changes - to be sure you will be comfortable with these new features. Any changes you make can easily be discarded or reversed if Microsoft comes to their senses and gives us (laptop and desktop users) the features we want (and need) in a future update.
Even though I encourage you to read the first few sections before resorting to a third-party software solution you can, if you wish, simply skip ahead to the Third-Party Start Button Menu Programs section and choose a start button menu program to download and install and be done with it.
After an update to Windows 8.1 it will no longer be necessary to use the task scheduler to boot to the desktop.
If your PC is running Windows 8.1
*Go to the desktop and right click on the taskbar and choose Properties.
*In the Task Bar and Navigation Properties window click on the Navigation Tab.
*Put a check in the box next to: Go to the desktop instead of Start when I sign in.
If your PC is running Windows 8
You have two options. You can install a third-party start button menu program which includes an option to boot to the desktop or use the following procedure to enable Windows to start at the desktop instead of the Start Screen.
*First, open the Task Scheduler by typing Tasks or Task Scheduler in the Start Screen, (just start typing).
Or by going to Control Panel then System and Security then Administrative Tools then finally Schedule Tasks or Task Scheduler.
How to open the Control Panel: Press the Windows+X keys then choose Control Panel in the Quick Link Menu that appears.
*Once the Task Scheduler is open, click Action in the menu at the top left and choose Create Task.
*In the Create Task window Name your task - Boot to desktop - or something similar. (Note: You will be listed as the author using your user account.)

*In the same window, at the very bottom where it says Configure for: Choose Windows 8 from the drop down menu. You'll notice the default is Windows Vista, Windows Server 2008. Don't click OK yet!
*In the same window - Open the Triggers tab, select New (at the bottom), and then choose At log on in the 'Begin the task' drop-down menu at top.

*Click OK in the New Trigger window, and then open the Actions tab. Click New again then enter explorer in the Program/script field of the New Action window.

*Save the action by clicking OK in the New Action window.
Only if you have a laptop PC - Before you close the Task Scheduler.
*Click on the Conditions tab in the Create Task window and you will see a check in a box before the line: Start the task only if the computer is on AC power. Uncheck this box.
If you have a desktop there is no need to worry about this last step.
If you wish, you can click the Action and Triggers tabs again to be sure your settings are correct. If everything is correct click the General tab.
*You can now save the entire task by clicking OK in the Create Task window and then close the Task Scheduler window.
You're done!
From now on, every time you log in to Windows, you'll automatically jump to the desktop, where the first thing you will see is an open Libraries folder.
If you decide at a later date that you no longer want your PC to boot directly to the Desktop you can return to the Task Scheduler and either disable this task or delete it.
Note: Select the entire string - including parentheses and semicolon. If somehow the pasted text has curly quotes enclosing Shell.Application your script will do nothing. There should be straight quotes. (or Plain Text)
*In the Notepad program click on the File menu and choose Save As.
* In the Save window name the new Notepad file Shutdown.js (The file name must have a .js extension.)
*Also in the Save window choose All Files instead of Text Files.
*Choose to save the file on your desktop.
Your new file's icon should look like this:
Try it!
Double-click the newly created file to be sure it calls the Windows Shutdown Dialog Box. This dialog is already a part of Windows and this is the easiest way to call it up. You will notice that the dialog has options to restart, sleep, switch user and log off as well as Shutdown. (Click Cancel or elsewhere on the desktop and the Shutdown menu will go away.)

Not quite finished…
Your file does not quite look like a Shutdown button does it? If you wish you can make it look a bit more finished.
First of all you need to put the file somewhere out-of-the-way. You don't want to leave it hanging around on your desktop.
*Place your newly created Shutdown.js file somewhere in your file system. The Documents folder is a good place. You can even put in its own folder, it doesn't matter, to reduce desktop clutter you should put it in an out-of-the-way place.
*After you have moved the file to its final resting place right-click on it and create a shortcut and then drag that shortcut to the Desktop. You can close any open folders now.
*Right-click the shortcut and choose Properties. Click Change Icon.
*Choose an icon that suits you for a Shutdown button.
The red power button is always a good choice.
![]()
*Click OK and then Apply and OK again.
This is your new Shutdown Button that calls the Windows Shutdown Dialog box. Double-click it to make sure it works then leave it on your desktop for now.
*In the desktop, right-click on the Task Bar. Choose Toolbars, then New Toolbar.
*Copy the following location text in the Folder text entry box in the New Toolbar window.
It should look like this after you paste the location text.
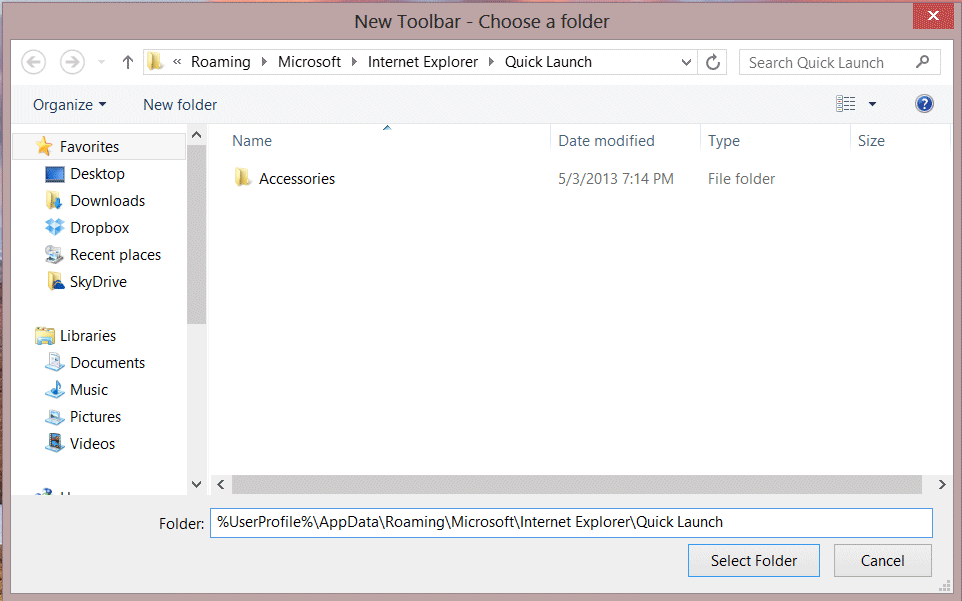
*Click the Select Folder Button and you now have a Quick Launch Menu in your Taskbar.
Place your Shutdown Button in the Quick Launch Menu
Simply drag your earlier-created Shutdown Button to the Quick Launch area on the Taskbar. When your cursor is atop the Quick Launch area you will see the text Move to Quick Launch. Drop it there and your Shutdown button is now in the Quick Launch menu.
Try it! Click again on Quick Launch and you will see Shutdown as a menu option.
When you install any new programs you can add their shortcuts to the Quick Launch Menu in the same way!
You can now drag the Shutdown shortcut that's on your desktop to the Recycle Bin if you wish - to get it out of the way.
Note: If you decide, at a later date, that you no longer wish to have a Quick Launch menu in your Taskbar just right-click on the Taskbar choose Toolbars and remove the check from the Quick Launch option.
*Start by creating a new Shortcut on your Desktop. Right-click on the Desktop and chose New and then Shortcut.
*Copy one of the following location texts and then paste it into the location box in the Create Shortcut window.
When pasted into the location of a shortcut the above location text will enable the shortcut to bring up the All Apps Screen in the Windows 8 New (Modern) interface. (Includes the Search Window)
OR
When pasted into the location of a shortcut the above location text will enable the shortcut to open a desktop window containing New (Modern) Windows 8 Apps. In addition this window will contain Shortcut Icons for all of the other programs you have installed to this point.
Note: Use one location or the other - but not both in the same shortcut.
The Create Shortcut window should look like the one below after pasting the location text.

*After pasting the location text hit the Next button then type a name for your new shortcut. Something like All Apps or New Apps would do. Click the Finish button.
*Place your new All Apps shortcut in the Quick Launch menu the same way you did for your shutdown button.
You're done!
Now you need an easier way to get to the Control Panel and some of the other Administrative tools on your PC.
Press the Windows+X keys: The Windows 8 Quick Link Menu will appear in the lower left of your screen. Perhaps you used it earlier to get to the Control Panel.
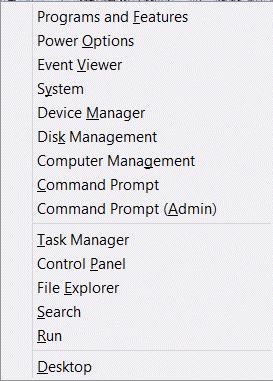
You can get to this menu by clicking the Windows+X keys even if you are in the Start Screen.
In Windows 7 the Windows+X keys brought up the Windows Mobility Center. However in Windows 8 these same keys summon what Microsoft calls the Quick Link Menu. The Mobility Center is also included (but only on a laptop PC).
The Quick Link Menu is referred to by other names on different websites. Some call it the Admin Menu, others call it the Power Users Menu. But Microsoft refers to it as the Quick Link Menu on their support site.
If you have not yet used a third-party Start Button Menu program to disable the hot corners:
If you move your cursor to the bottom left corner of the screen you will see a tiny window of the Start Screen. A regular left-click here opens the Start Screen. However if you Right-click in this corner the Quick Link Menu will appear.
However if you are in the majority - one of those who has a PC running Windows 8 Home edition (Or simply Windows 8) - you can only make this change in the Windows Registry since Windows 8 (regular or Home Version) has no Group Policy Editor.
If you are not sure which edition of Windows 8 your PC is running you can go to the Control Panel and choose System and Security then System. At the top of the window you can see which edition of Windows your PC is running. You will note that the System window also displays other information about your PC that may interest you.
If your PC is running Windows 8 Professional
*Start the Group Policy Editor by pressing the Windows+R hot keys and typing gpedit.msc OR by typing Group Policy in the Start Screen and then click on the Settings category.
The option for Edit Group Policy should now appear.
*Click on the Edit Group Policy option and the Group Policy editor will open.
*Under the Local Computer Policy, expand the tree to the following path: Computer Configuration\Administrative Templates\Control Panel\Personalization
*When you see Personalization, left-click on it to select it as shown in the image below.
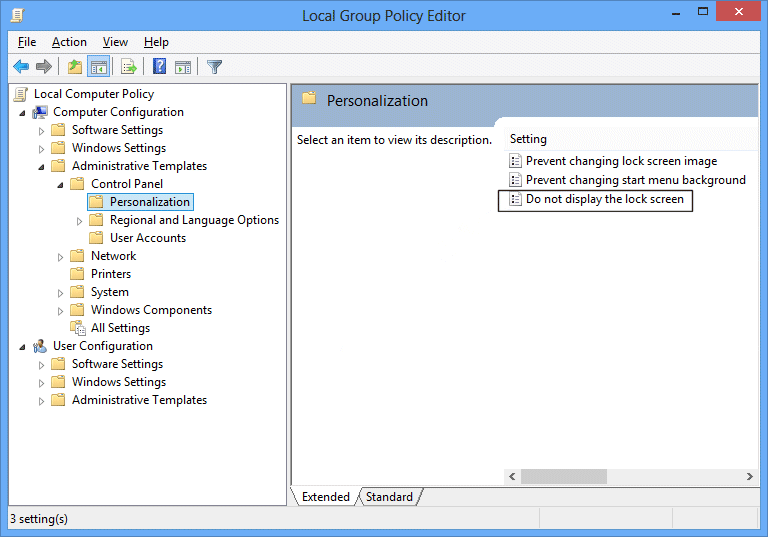
*Double-click on the Do not display the lock screen setting in the right pane and its properties screen will open.
In that screen (Not shown for brevity) you will see three radio buttons on the left. They are labeled Not Configured, Enable, and Disable. (You will see that Not Configured is chosen by default.)
*Choose the Enable radio button on the Do no display the lock screen setting then click Apply then OK to dismiss that screen.
*Close the Group Policy Editor and you will not see the Lock Screen any longer when you login to Windows.
Note: if you wish to change this back at some time in the future simply go back to the Group Policy editor and change the setting back to Not Configured.
If your PC is running Windows 8 (Home)
You can change this setting only by using the Windows Registry Editor or by using a registry file.
Before you make any changes in the Registry you should know that this particular change (as far as I am able to determine) has not been sanctioned by Microsoft. Unsuccessful (or unauthorized) changes in the Windows Registry have the potential of making your PC unstable (or even unusable).
So, if you do not feel comfortable editing the Registry perhaps you should just leave the Lock Screen alone.
But if you wish to proceed (even knowing the risk) you can go to this web page at the How-to-Geek site. They provide a registry file and/or instructions to do it yourself.
Hibernate writes a file to your hard drive and sets your notebook into a powered-down state, which is different from the Sleep option that sets your PC into a low-powered state that still draws a trickle of power from your battery.
If you have ever come back to an unplugged notebook PC that was put to sleep only to find the battery drained you will know exactly what I mean.
If you have a notebook PC with a Solid State Drive (SSD) you may not want to enable Hibernate because of the extra writes to the hard drive that are required to use it.
Hibernate was not removed as an option in Windows 8, it was simply disabled and obscured in the Power Options Menu.
If you have a notebook PC with a normal hard drive get the hibernate option back by changing settings in the power menu.
*Open the Control Panel, change the View by: to Large Icons, and choose Power Options.
To open the Control Panel: Press the Windows+X keys then choose Control Panel in the Quick Link Menu.
*Select Choose what the power buttons do - on the left.
*In this window find the link Change settings that are currently unavailable. Click it.
You must be signed (logged) in as the Administrator to change this setting.
*Scroll further down the same window and you will see Hibernate listed in Shutdown settings.
*Put a check in the box next to Hibernate and click Save Settings at the bottom of the window.
From now on you will see Hibernate as an option in the power menus.
You may ask: "Why didn't he simply tell me this to start with?"
First, this involves installing third-party software that is not an original part of Windows 8.
Second, you have learned more about your new Windows 8 PC than you would have if you hadn't read all of the above, right?
And you may still decide you wish to use one of other of the extra features listed above even if you install a Start Button program.
For example, the Quick Launch menu is a great feature - with or without a Start Button - and if you have a laptop you may want Hibernate enabled also.
Following are my three top recommendations for Start Button Menu programs. Be sure to view the screenshots at each site since they will give you a very good idea what each menu will provide in the way of features.
Classic Shell http://www.classicshell.net/ (This is the one I use.)
This excellent, free program provides you with a reproduction of the Windows Start button menu. The layout is nearly the same as Windows 7 - Cascading menus included.
After installation right-click the start button to bring up a menu which includes a Settings window where you can customize Classic Shell to your heart's content.
Classic Shell's settings includes an option to to boot directly to the desktop. It's easy to turn off the irritating hot corners that activate the Charms Bar.
If you wish, you can even replace the bland Windows Start Button with another one that looks much better!
- *To do this right-click the Start Button then choose Settings (The settings window will open.)
- *Next choose All Settings at the bottom of the window (Top of the window in the latest version).
- *Now choose Windows 8 Settings tab and put a check in the Skip Metro Screen box. Then choose the All radio button further below.
Start 8 (US $4.99, Free trial available) http://www.stardock.com/products/start8/
Start 8 from Stardock may be the most faithful reproduction of the Windows 7 Start Menu. This Start Menu program from Stardock has a good customizable interface and may very well be worth the $5 they charge for it. Try it for free for 30 days.
To sum up: If you like the way the Start Button worked in Windows XP then Classic Shell is for you. However if you want a more faithful rendition of the Windows 7 Start Menu, Start 8 may be more to your liking.
All of the Start Menu programs I've tested seem to be stable as well as customizable and, in addition, they all include an option to boot to directly to the desktop - bypassing the Start Screen without creating a Task, as well as disabling those occassionally irritating hot corners.
After download and installation be sure to configure the settings of your new Start Button Menu program. Settings are normally accessed by right-clicking the Start Button. In the settings menu you should see where you can set your computer to boot directly to the desktop bypassing the Start Screen and also turn off those annoying Windows 8 hot corners. Then restart your computer to be sure everything works as advertised.
If you think the shelf is nearly bare with only two choices for Start Menu programs here's a few more to look at before (or after) you make your choice:
ViStart (Free), StartIsBack ($3.00 US), Start Menu Reviver (Free), Start Menu 8 (Free).
Although most of this extra software is not harmful some of it may be potentially dangerous as well as unwanted. For this reason antivirus software companies such as Norton, Mcafee, and others have a name for this unwanted software, PUP (potentially unwanted program).
It is wise to always avoid these PUPs.
It is inadvisable to simply click through any software installer without watching what it is doing.
This applies to all free and low-cost programs that you can download from the internet. Nearly all reputable software has options, either before installing or in the installer itself, that allow you to decline (usually by unchecking) unwanted software installs.
It appears that some vendors of free or low-cost software really want you to install these extra PUPs, so be aware that in some installers these options to decline are either intentionally confusing or not very obvious.
In some cases you must choose a custom install to avoid this bloatware.
Be careful when updating also:
This warning also applies when you are updating free software. Many of these update installers will also place (by default) unwanted software or trial or PAID versions of wanted software on your PC if you do not decline it.
Use a free installer/updater program that requires no installation to use. Download and run!
If you grow weary of the need for this constant vigilance you can get a small program that will either install or update your important software for you without installing bloatware or any unwanted programs along with it.
Download the Ninite installer app from http://www.ninite.com after choosing the programs you want it to install or update.
If you decide to use Ninite be sure to use it to install or update Adobe Shockwave (which includes the Flash Player) and Adobe Reader.
And if you have Oracle's Java installed be sure to include it also since the Java installer is one of the worst bloatware/PUP offenders of all.
If your software is already up-to-date the Ninite installer will let you know and do nothing.
There are a number of sites on the internet that have Freeware, Shareware, and Paid Software for download. But one of the best is Filehippo.Com.
The site promises virus and malware free downloads.
Filehippo has older versions of most programs available for download as well as the latest versions. This is a good option since many users swear, when it comes to some programs, that one earlier version or the other has killer features that were dropped in a later version.
In any case this site can provide you with either free or low-cost software that will enable you to do just about anything you wish to do on your PC.
A note concerning security software:
If your new PC does not come equipped with a third-party antivirus program I recommend that you get one.
I can recommend three good antivirus programs - two of them are completely free and the other is a paid program.
The two free antivirus programs are Avast Free Antivirus and AVG Free Antivirus. Both programs feature automatic downloads of virus and malware definitions and both do a great job of keeping your PC free of threats.
Be aware that both of these free antivirus programs will offer paid versions and features - decline them - take the free stuff and run!
However if you feel that paying for an antivirus program will be best then choose Norton Antivirus - it is a perennial top-rated antivirus choice that will do an excellent job of protecting your PC.
Also be aware that you can opt for the more expensive Norton Security Suite or the even the more pricey Norton 360. However the regular Norton Antivirus should be all you need.
Note: If you chose to opt for one of the above antivirus programs (free or paid) but you have one installed already you should uninstall it first. Running two active antivirus programs is not recommended.
If you experience any problems with any programs that do not open when you double-click a file you expect that program to open go to Setting Default Programs to learn how to set program defaults.
For much more specific information concerning free software read my file Freeware.
Also, if you suspect you may have malware on your PC but are not sure, read my file How you know you have malware on your PC.
Create Recovery Media
Soon after you get your PC it is an extremely good idea to make Disaster Recovery media in case of a faulty hard drive (hard drive crash).
Note: If there is nothing wrong with your hard drive, but Windows OS is corrupted and will not run properly, perhaps from a malware attack, the new Windows 8 Refresh feature can re-install Windows and allow you to keep your files. See How to Refresh or Reset your Windows 8 PC.
Recovery media does not save your data!
Recovery media merely returns your PC to its factory defaults. It does not save the files (music, pictures, text files, etc.) that you may have accumulated after days, weeks, or months of use.
To recover your data you must have it backed up on an external hard drive, a USB flash drive or to the Cloud.
Most PC Makers do not include recovery media with a new Windows 8 PC, but all PC makers include a one-time option to create recovery media. Recovery media can be created on multiple DVDs (as many as 8 DVD disks or more) or a single USB flash drive (Either 16GB or 32GB size).
Note: You can also contact your PC's manufacturer to order Recovery media for a fee.
For more information about backups see How to backup your files, which also contains information about how to create your recovery disk(s).
Quit a Start Screen APP:
First of all: When you start a Windows 8 (Modern) App you will notice that there is no red X in the top-right of the window to exit the program. Microsoft asserts that these Apps use very few system resources when running in the background and they will quit automatically after some (unspecified) time if they are idle.
However I am a big fan of closing programs that are no longer being used. If you feel the same way, exit them in the following manner. Hit Alt+F4
Since there is no obvious way of closing Windows 8 apps (Modern Apps), a quick and easy way to quit these apps is to hit the Alt and F4 keys at the same time.
You can also use the Task Manager (available by right-clicking the Taskbar) to close running programs and even disable unnecessary startup items.
Save your work first! Both Alt+F4 and the Task Manager will forcefully close any running Windows App or program without saving info.
If there is no app, program running, or open window in the fore-front Alt+F4 will open the Windows Shutdown dialog box when in the desktop.
A full list of Windows 8 hot key shortcuts is available on the Microsoft Support Website.
Windows shell (Start screen)
The following Windows key shortcuts work in the new Windows shell/Start screen.
WINDOWS KEY - Toggles between the Start screen and the foremost running app (Modern-style) or the Windows Desktop. (You can hit this key to get to the Windows (Explorer) desktop from the Windows 8 (Modern) start screen.)
WINDOWS + 1, WINDOWS + 2, etc. - Switch to the (classic) Windows desktop and launch the nth shortcut in the Windows taskbar. So WINDOWS + 1 would launch whichever application is first in the list, from left to right.
WINDOWS + B - Switch to the (classic) Windows desktop and select the tray notification area.
WINDOWS + C - Display Charms and time/date/notification overlay. (Note that this shortcut displays the charms in the lower left of the screen and not on the right as would be the case using touch.)
WINDOWS + D - Switch to the (classic) Windows desktop and toggle Show Desktop (hides/shows any applications and other windows).
WINDOWS + E. Switch to the (classic) Windows desktop and launch Windows Explorer with Computer view displayed.
WINDOWS + F - Search Files using the new Windows Search pane.
WINDOWS + I - Display Settings pane for the Start screen (also provides access to Networks, Volume, Screen Brightness, Notifications, Power, and Language).
WINDOWS + L - Lock PC and return to Lock screen.
WINDOWS + M - Minimize the selected Explorer window.
WINDOWS + O - Toggle orientation switching on slate and tablet PCs.
WINDOWS + P - Display the new Project (for "projection") pane for choosing between available displays.
WINDOWS + Q - Search (within) Apps using the new Windows Search pane.
WINDOWS + R - Switch to the (classic) Windows desktop and display the Run box.
WINDOWS + U - Switch to the (classic) Windows desktop and launch the Ease of Access Center.
WINDOWS + X - displays the Windows 8 Quick Link Menu.
WINDOWS + Z - Display the App Bar in a Modern-style app.
Note that tapping WINDOWS + [any unsupported letter] will trigger a Search Apps (and classic applications) task using the new Windows Search pane, with the letter pre-typed in the search box. So WINDOWS + A would start searching for apps (and applications) that include the letter 'a'. This is no different from simply tapping the letter 'a' at the Start screen, since any such typing starts the Search Apps task.
Windows desktop (classic)
The following Windows key shortcuts work in the classic Windows desktop. Note that while many of these shortcuts also work in Windows 7, some are new to Windows 8.
WINDOWS - Toggles between the Windows desktop environment and the new Start screen. (If no third-party Start button program is installed.)
WINDOWS + 1, WINDOWS + 2, etc. - Launch the nth shortcut in the Windows taskbar. So WINDOWS + 1 would launch whichever application is first in the list, from left to right.
WINDOWS + B - Select the tray notification area.
WINDOWS + C - Display Charms and time/date/notification overlay.
WINDOWS + D - Toggle Show Desktop (hides/shows any applications and other windows).
WINDOWS + F - Search Files using the new Windows Search pane.
WINDOWS + I - Display Settings pane for Windows Desktop (also provides access to Networks, Volume, Screen Brightness, Notifications, Power, and Language).
WINDOWS + L - Lock PC and return to Lock screen.
WINDOWS + M - Minimize the selected Explorer window.
WINDOWS + O - Toggle orientation switching on slate and tablet PCs.
WINDOWS + P - Display the new Project (for "projection") pane for choosing between available displays.
WINDOWS + Q - Search (within) Apps using the new Windows Search pane.
WINDOWS + R - Display Run box.
WINDOWS + U - Launch Ease of Access Center.
WINDOWS + W - Search Settings using the new Windows Search pane.
WINDOWS + X - Displays Windows Quick Link Menu.
WINDOWS + ARROW KEYS - Aero Snap.
With the release of Windows 8 Microsoft no longer includes software to view DVD videos. If you have Windows 8 Professional you have the option to purchase and download a Media Pack from Microsoft, but if you have the standard Windows 8 (Home) version that option is not open to you and you need to search for a third-party alternative.
Just such an alternative is available as a free program. Download and install VLC Media Player then set it's defaults to play DVD videos and you're all set.
VLC Media Player can play all video formats without the need for codec packs - even DivX!
If you play DVD videos on your PC then VLC is for you! Get it straight from VideoLan or at Download.Com or FileHippo.
When you first unboxed your new Windows 8 PC and started it you were advised, during the first boot process that you should have a password to log into your computer. If you were like most people you just entered one and that was that.
Perhaps you discovered that logging into your PC with its lock and logon screens was a hassle but you could find no simple option to change it.
However, if you decide your Windows 8 PC is in a secure environment, and you have only one user account and you have no need for password protection when you boot your PC you can eliminate the need for password entry.
I do not recommend this on a laptop that you carry outside the home since this removes all security from your PC - anyone can use it. Instead use the PIN Option.
Very important - Either write your current password down and put it in a safe place or create a password reset disk.
The reason for this is that Windows will remember your current password and revert to it if you decide to reverse your decision to not to use a password at a later date.
At that time, if you have forgotten your current password, you will need it or the reset disk to boot your PC again.
Setup your PC to boot without a password:
*Click the Start Button and type netplwiz into the Search Window or just start typing netplwiz in the Start Screen.
There will be only one result if you type into the Start Screen
*In the User Accounts dialog that appears, uncheck the box marked Users must enter a user name and password to use this computer.
*Click OK, then enter your password (twice).
*Click Apply or OK and Restart your PC.
Viola! No more need to enter a password.
If at a later date you decide it would be best to have a password for your PC then reverse the above actions.
Put the check back into the box marked Users must enter a user name and password to use this computer then click Apply or OK and restart your PC.
Create a password reset disk:
*Click the Start Button and type password reset into the Search Box.
You can also get to this by going to User Accounts in the Control Panel.
*Follow the directions in the Forgotten Password Wizard dialog - you'll need a USB Flash Drive.
Note: Windows will only allow you to create one password reset disk. If you create one keep it in a safe place since anyone can use the disk to reset the password on your PC.
Instead of a password!
You can use a four-digit pin to logon to your Windows 8 PC instead of long password. Use the following procedure to enable the pin.
*Click in one of the right corners - upper or lower - to enable the Charms Bar.
*In the Charms Bar choose Settings then Change PC Settings - at the bottom.
*In the Settings Window choose Users.
If you have installed a third-party Start Menu program and used it to disable the Windows 8 hot corners there is no need to re-enable them to get to this window.
*Instead do this:
*Open the Control Panel - change View by: to Large Icons then choose User Accounts.
*In the User Accounts window click on Make changes to my account in PC settings.
*In the Users Window that appears click Create a PIN.
You will need to enter your current logon password.
*Click OK and enter your PIN (twice) then Click OK
Hit the Windows+D keys to get back to the desktop and close the Control Panel.
That's it! Every time you boot your PC from now on you will be able to use the four digit pin instead of the long password.
You will still be able to logon to your PC using your normal password if you wish. This merely adds an additional choice to the login screen - another (shorter) logon option.
It is understandable that many persons will want to upgrade to Microsoft's latest and greatest as soon as possible.
However my advice is to wait a while to see how the very first updaters have fared.
Not sure which version of Windows your PC is running?
*If you have installed a third-party Start Menu click the Start Button and then right-click This PC, then choose Properties from the context menu that appears.
*If you have no Start Menu Program yet go to the desktop (by pressing the Windows + D keys). Then press the Windows + X keys (at the same time) and choose System from the menu that appears.
Either way, the System window will open where you can see which version of Windows your PC is currently running.
If your PC is running Windows 8 read on.
However if your PC is already running Windows 8.1 See Windows 8.1 Update to find out if further update action is necessary.
Things to consider: (Before you upgrade to Windows 8.1)
If your PC is currently running Windows 8 and you are experiencing no problems you have little to lose by waiting - or not installing the update at all!
This is especially true if you have no touch screen, work primarily in the desktop, and use a third-party Start Button Menu program.
There are no new "killer" features that are enabled or installed by the Windows 8.1 Update - unless you have chosen to work in the Start Sceen more than in the desktop.
Caution!
If you decide you wish to install the upgrade from Windows 8 to Windows 8.1 be aware that you will need to also apply the Windows 8.1 Update afterwards to continue receiving any important or critical updates (especially security updates) from Microsoft through Windows Updates.
See Windows 8.1 Update
If, however, you decide to stick with Windows 8 (rather than upgrading to Windows 8.1) don't worry. You will continue to receive all important and critical updates through Windows Update just as you always have until January 12, 2016, when you will be required to upgrade to Windows 8.1. So you have quite a while to think about it.
Before you upgrade to Windows 8.1:
- *Back up your personal data and files either by using a USB Flash Drive or by creating a System Image and a USB Recovery disk (If you have a large enough external drive.)
- *Be sure you have disks or installer programs to reinstall your desktop programs should any of them be lost.
- *Run a scan for Malware - Use Malwarebytes Free scanner to run a quick scan to be certain your system is clean - Be sure to update the virus definitions first! You certainly don't want to carry any spyware or virus files through to Windows 8.1!
- *Check Windows Update - be sure it's set to download and install all updates automatically. The update will sometimes quit with an error if all necessary Windows updates have not been applied successfully.
-
*Microsoft recommends using a Windows Live account to log in to your PC when updating (Rather than using a separately-selected username and password to log in to your PC). If you do this, it is important to rememeber your Microsoft account email password.
I have not personally updated any Windows 8 PCs without a Microsoft Account so far but I believe that using a Microsoft account to log in will enable things like Onedrive connectivity with the Start Screen modern app much easier. If you plan to use Onedrive with the separately downloaded desktop application it shouldn't matter.
*Then you should read the directions first! Go to Update FAQ from Microsoft! Read the Upgrade Assistant FAQ then download and run the Upgrade Assistant, especially if you have concerns about the compatibility of installed programs.
*Finally, if your PC is currently running Windows 8 simply go to the Start Screen and click on the Windows Store Icon. Click the large button that says Update to Windows 8.1 for free!
The update should be applied automatically with little user input - Other than entering your Windows password and choosing your default settings.
(If you have disabled the Charms Bar and the Start Screen with a Start Menu Program it is not necessary to change those settings. Simply Click the Windows + C keys and then Click Start on the Charms Bar to get to the Start Screen.)
After updating a few PCs to Windows 8.1 I have noticed a few things:
After clicking the update button in the Windows Store the install will sometimes quit with an error. If this is the case for you, and you have followed all the steps above, simply keep trying.
Be aware that the download is large (multiple gigabytes) - it will take quite a while to download before the install begins.
While Windows 8.1 is being installed your PC will sometimes show no indication that anything is happening. Don't be tempted to interfere! Your PC will restart two or three times before the update completes.
If your Windows Updates are current and you have no malware problems the update should sooner or later download and complete successfully. Persistence is the key!
After the update completes:
If you have installed a third party Start Button Menu program before the upgrade you will most likely need to either reinstall it or choose repair with the installer program.
Be sure your new Start Button has replaced the poor excuse for a start button that comes with Windows 8.1.
Check all of your Start Button Menu program settings - take time to set it up exactly how you want it!
If you have a PC which had Windows 8.1 installed when you bought it or have recently upgraded from Windows 8 to Windows 8.1.
Now Microsoft has released a further update for Windows 8.1 users. It may be easy to confuse this update with the Windows 8 to Windows 8.1 upgrade available through the Windows Store. However this update is available through Windows Update - no need for a separate download. Read about it in this statement from Microsoft.
Among other things the update allows pinning Modern (Metro) apps to the desktop taskbar. This may be helpful if you actually use any of these apps. See ModernMix for more info on this.
Microsoft has stated that this update will be applied without user action to any PC running Windows 8.1 that has its Windows Updates configured automatically. But I have noticed that this update is listed in Windows Updates Important updates but is sometimes not checked to be added automatically.
What to do:
If you bought a PC that came with Windows 8.1 installed or have recently upgraded to Windows 8.1 from Windows 8 check to see if the Windows 8.1 Update is installed. To check if you have the Windows 8.1 Update already installed simply look at your Start screen.
If you see a search button (a magnifiying glass icon) next to your account picture (and the power icon) in the upper-right corner, your PC is running Windows 8.1 Update and no further action is necessary.
If no search button is present, read on.
It's all in the details
It's not only important that you install this update - it's critical!
Read the details (below) for this update - especially the part in bold type (my addition).
Windows 8.1 Update for x64-based Systems (KB2919355)
Update type: Important
Windows 8.1 Update is a cumulative set of security updates, critical updates and updates. You must install Windows 8.1 Update to ensure that your computer can continue to receive future Windows Updates, including security updates. For a complete listing of the issues that are included in this update, see the associated Microsoft Knowledge Base article for more information. After you install this item, you may have to restart your computer.
If you do not install this update you will, after May 13, 2014, quit getting windows updates from Microsoft. So be sure that it's installed!
Check for and install the update
Check Windows Update (in the Control Panel, Click Important or Critical updates) If the Windows 8.1 Update is not checked to be installed in the Select Updates to be Installed window simply check it then click Install (at the bottom of the window). If, for some reason you get an error just keep trying until the update begins to download.
The update is quite large - possibly 600MB or larger - and will take some time to download and install. It may appear that nothing is happening. So be patient. Do nothing to interfere with either the download or the installation. Only shutdown or restart your PC after the update has been installed.
Good luck!
If you have installed a Start Menu Program and plan to work exclusively in the desktop it might be necessary to set some of the desktop programs as default. Occasionally when you double-click a file one of the modern apps from the Start Screen may open them instead of the desktop programs you have installed for that purpose. Generally when you install a new program it will assume its defaults - meaning that it will open the files you expect it to. But not always!
If this ever happens it is easy to fix.
*Simply open the Control Panel then choose to view by Category.
*Select Programs - Default Programs - Set your Default programs.
*Highlight the program that is not opening the files you want then go to the bottom of the window and choose Set this program as Default.
From now on that program will open all the files properly instead of one of the modern apps from the Start Screen. That way you will continue to work in the desktop rather than being unceremoniously being switched to the Start Screen/modern apps.
If you happen to have a file type that you would rather a particular program open rather than the default one then you can Choose Default Programs in the Control panel then choose Associate a file type or protocol with a program. After the Screen loads simply choose your file type (extension) by highlighting it then choose the program you want it to always open by clicking the Change Program button at the upper right.
The program you choose will alway open files of this type rather than the default program.
This is helpful, for instance, when you wish to open an mp3 audio file (song) with the fast-loading Windows Media Player rather than have to wait for the slow-loading iTunes program to open to play your song.
Again, if you have decided to work exclusively in the desktop in Windows 8 you should know that the Modern Apps installed in the Start Screen may continue to be active. These Apps are set by default to perform actions like downloading data in the background - as in the case of the Weather App, Netflix App, or News App - and others.
Even if you do not plan to ever use these Apps they may still be actively downloading data, sometimes using valuable internet bandwidth (slowing your connection) to do so.
You can easily disable these apps to free up your bandwidth if you choose by going to PC Settings.
- 1. Press the Windows+C keys to open the Charms Menu.
- 2. Choose Change PC Settings at the bottom.
-
3. In PC Settings choose Search and Apps in Windows 8.1.
(In Windows 8 simply choose Notifications skipping #4) - 4. In Search and Apps choose Notifications.
- 5. In this window you can disable all app notifications (by turning them all off) or just the ones you don't plan to use (scroll further down to choose the ones to turn off). If you see an app listed you don't know about then its probably best to turn it off.
Tip: You can also choose to turn off Sharing for Apps by choosing Share in the Search and apps screen in Windows 8.1.
In Windows 8 simply choose Share in PC Settings.
Turn Off Smart Search!
Before leaving PC Settings you should also consider turning off the so-called Smart Search in Windows 8.
Microsoft would have you believe that this feature improves your internet searches by making them simpler. However what it really does is to enable Bing to keep track of all of your searches - local searches as well as internet searches.
You can turn Smart Search off in PC Settings by choosing Search and Apps then Search. In this window turn off the switch that's labeled Use Bing to Search Online.
6. Once you have finished just press the Windows + D keys to go back to the Desktop.
That's it!
Last but possibly not least.
If you (lord help us) actually like some of the Modern (Metro) Apps you can use a utility program from Stardock called ModernMix to run them in a desktop window - rather than the full-screen version normally used in Windows 8.
ModernMix, which costs $5 (same as Start8), performs only this one function, but does this one thing quite well.
Is Windows 8 compatible with Windows 7?
There is some concern that a PC with Windows 8 will not be compatible with or run the same programs as a PC with Windows 7.
Some have said that Windows 8 is not supported by their employer's Information Technology (IT) department. It is true that this would be a concern if you were to carry your personal Windows 8 PC to your workplace to connect it to the business network.
But if you plan to use your Windows 8 PC at home merely to work with files from your business then this should not be a concern at all.
A PC with Windows 8 will run nearly all of the programs a PC with Windows 7 can run. There are very few exceptions and these exceptions are mostly older programs created for Windows XP. (Windows 7 may also have problems with some of these older programs.)
So, if you must work with business files at home on your personal PC you should ask your IT department to provide you with the proper program(s) to open and save these files in the proper format.
To learn more about the program and file compatibility of Windows 8 with previous versions of Windows see this Microsoft page.
See also the Windows Compatability Center.
Can't remember your login password?
Reset the password of a Microsoft Account
If you use a Microsoft account to login to your PC and you have forgotten the password you can use Microsoft's online form to reset your password. You can do this from another PC, a smart phone, or a tablet that has internet access.
Go to https://account.live.com/password/reset then complete the form.
If you have included another email address or your cell phone number to your account, as recommended, it will be relatively easy to reset your PC's password as long as it's connected to the internet. Your new password will be sent to either your phone or your secondary email address, whichever you specify.
If, however you have added neither a secondary email address nor a cell phone number you can still get your password reset if you can remember your security information you included when you originally set up your Microsoft account. Use the questionaire to provide this information.
If you need more information about the procedure for resetting your Microsoft Account password go to the Microsoft account FAQ.
Reset the password for a local account.
If you use a local account to login to your Windows 8 PC there is no easy solution. I suggest you see this article from PC World Magazine which explains how you can reset or blank your login password. If you have access to a Hiren's boot disk as suggested in the article it will work just fine to blank your password.
If not I suggest you bring your PC to a local PC repair person who can do it for you (for a fee or course).
Warning: If you have used bitlocker or any other encryption tool to encryt the files on your PC they will stay encrypted even if you gain access to your PC using Hiren's boot disk. You will need to remember your original windows password to unlock them.
Create a password reset disk for a local account
If you think this might be a problem in the future, to avoid this sticky situation you can create a password reset disk using a USB Flash Drive. Note: Data on a flash drive can easily be changed or deleted. It is not recommended that your use your password reset disk for any other purpose.
To do this simply type password reset into the search box in the Start Screen or Start Menu then choose Create a password reset disk from the choices.
When the Forgotten Password wizard appears just follow the directions.
You may have noticed that when you click on the folder icon in the desktop taskbar a file explorer window opens but there are no libraries in the window.
Microsoft didn't eliminate the libraries in Windows 8, but they are not shown by default - for whatever reason.
*If you want the libraries back simply click the View menu in any file explorer window then click the Navigation Pane icon (to the left). Click on Show libraries.
The next time you open a file explorer window you should see the libraries in the window. (Documents, Music, Pictures, Video)
Author's Note:
During the creation of this tutorial I have shamelessly ripped-off (stolen?) ideas, and tips from many other helpful sites on the internet. My thanks go to these and many others out there who have taken the time to provide instruction for other computer users.
Also, as I have discovered, there are also some info and tips out there on the internet that may be incorrect, incomplete or misleading. Take all advice you may find there with a grain of salt. Including mine!